Polishing stainless steel to a mirror finish can elevate your home’s aesthetics and make your appliances look brand new. Whether you want to refresh a kitchen appliance, a shiny countertop, or a stainless steel appliance, achieving that reflective beauty can be incredibly satisfying. With the right skills and materials, it’s a manageable task that can give your space a professional touch.
To polish stainless steel to a mirror finish, you will need to clean the surface thoroughly, assess any scratches or discoloration, and then proceed with sanding and polishing. Utilizing both power tools and hand techniques will ensure you achieve that coveted reflective shine. Throughout this process, proper tools and techniques play a crucial role in ensuring a long-lasting, brilliant finish.
In this guide, we’ll first explore the nature and importance of stainless steel. Understanding this material will give you insight into why polishing is beneficial. After that, we will go over the essential tools and materials needed for polishing. This will include both the common items you might have at home and some specialized tools that can make the job easier.
Next, we will discuss the important step of cleaning the stainless steel surface. A clean surface is vital for achieving that mirror-like shine. We’ll highlight the best cleaning practices and any common pitfalls to avoid, ensuring you set a solid foundation for your polishing work.
Lastly, we’ll assess the surface of your stainless steel items. Identifying any scratches or imperfections before starting the actual polishing will help you plan your approach. Let’s dive into understanding stainless steel, equipping you with the knowledge to create that flawless finish!
Understanding Stainless Steel
Stainless steel is an alloy made primarily of iron, mixed with chromium and other elements like nickel. The most notable feature of stainless steel is its resistance to corrosion and rust. This makes it an ideal choice for appliances, kitchenware, and various industrial applications. Its durability, combined with its sleek and modern appearance, ensures that stainless steel remains a popular choice in homes and businesses alike.
Many people are unaware of how easy it is to maintain and enhance the shine of these surfaces. The reflective quality of stainless steel can diminish over time due to fingerprints, smudges, and general wear and tear. This is where polishing comes in. By restoring the surface to a high shine, not only do you improve aesthetics, but you also increase the durability of the material by sealing it against future grime and deposits.
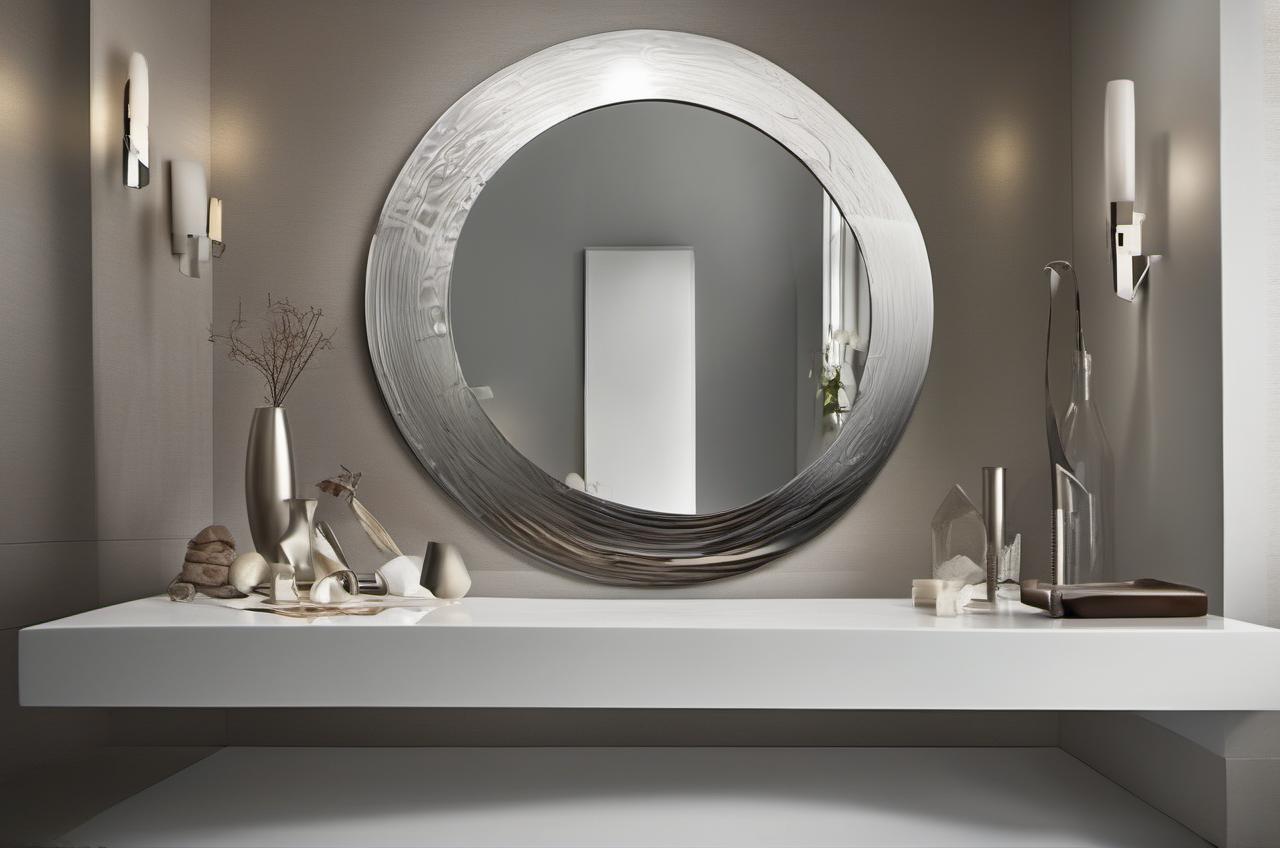
When polished to a mirror finish, stainless steel can add a stunning high-end look to any space. This reflective quality not only looks appealing but can also brighten rooms by reflecting light. Whether you have a dishwasher, refrigerator, or a countertop, the gleam of polished stainless steel can make a significant difference in the overall ambiance of your kitchen or workspace.
Additionally, understanding the composition and properties of stainless steel can help you choose the best techniques and products for polishing. Knowing what you’re working with will empower you to handle the polishing process with confidence, ensuring that you achieve the desired results without damaging the surface of your appliances or fixtures.
Tools and Materials Needed
Before diving into the polishing process, it’s essential to gather all necessary tools and materials. This initial preparation will make the entire process smoother and more efficient. Here’s a list of items you will need:
- Polishing Cloths: Lint-free cloths are ideal for applying polish and buffing the surface. Microfiber cloths are highly recommended due to their soft texture.
- Polishing Compound: Choose a high-quality polishing compound designed specifically for stainless steel. This will help remove scratches and achieve a mirror-like finish.
- Sandpaper or Polishing Pads: If your stainless steel surface has significant scratches, you may need various grits of sandpaper (from coarse to fine) or polishing pads.
- Electric Polisher or Drill: These tools can speed up the polishing process significantly, especially for larger surfaces.
- Protective Equipment: Always use gloves and safety goggles to protect your skin and eyes from dust and chemical compounds.
- Cleaning Agent: A good stainless steel cleaner will help you prepare the surface before polishing.
By using the right tools, you increase your chances of getting that perfect shine you’re after. Investing in quality materials may cost a little upfront but will ultimately make your job easier and provide better results. For instance, using an electric polisher can save time and provide a more uniform finish than hand polishing.
Remember to check your tools before starting. Worn-out pads or dirty cloths can scratch your stainless steel, leading to more work in the long run. Proper maintenance of your polishing tools will ensure they last and do their job effectively.
Having the right tools and materials is crucial for a successful polishing project. So, take your time to gather everything you need, and remember that good preparation is half the battle won!
Cleaning the Stainless Steel Surface
Cleaning your stainless steel surface is a vital precursor to polishing. Without a thorough clean, dirt, grease, and grime can interfere with the polishing process, resulting in a less-than-perfect finish. To start, gather your cleaning agent, a soft cloth or sponge, and some warm water.
First, rinse the stainless steel surface with warm water to help loosen any dirt or debris. Next, apply your chosen stainless steel cleaner or a solution of warm water mixed with a few drops of mild dish soap. Use a soft cloth or sponge to clean, working in the direction of the grain. Polishing against the grain can cause scratches, which can be difficult to remove later on.
Once the surface is clean, rinse it thoroughly with clean water to remove any soap residue. It’s crucial not to skip this step, as leftover cleaner can leave streaks and diminish the finish later on. After rinsing, dry the surface with a clean, lint-free cloth to avoid water spots.
If you encounter any tough stains or discoloration, don’t worry! You can remove these using a paste made of baking soda and water. Apply the paste to the affected area and gently scrub with a soft cloth. Always remember to test any cleaner or paste on an inconspicuous area first to ensure it doesn’t harm the stainless steel finish.
Thoroughly cleaning the stainless steel surface not only prepares it for polishing but can also reveal scratches and imperfections that need attention. It’s essential to be meticulous during this step, as it can make or break the final outcome of your polishing endeavor. Investing time and effort in cleaning will lead to a stunning mirror finish once polishing is complete. So, take a deep breath and enjoy this initial step of the process; it’s where it all begins!
Assessing the Condition of the Surface
Once your stainless steel surface is clean, it’s time to assess the condition of the material. This step is crucial as it will determine your approach to polishing. Begin by examining the surface under adequate lighting, checking for scratches, dents, or discoloration. Pay attention to areas that seem dull or have remnants of grime.
Identifying scratches is essential. They can vary from light surface marks to deep gouges. Light scratches can usually be buffed out with a quality polishing compound, while deeper scratches may require sanding prior to polishing. Don’t hesitate to feel the surface with your finger; you’ll be surprised at what you can detect through touch that might not be visible to the eye alone.
After you’ve assessed the scratches, take note of any stains or discoloration. Stainless steel can develop tarnishing due to food spills, oil, or even from cleaning products. If discoloration is significant, it may require more than just polishing. Sometimes, recurring dull spots indicate that the surface needs special attention, such as sandpaper or a specific cleaning product.
Lastly, consider the overall durability of the stainless steel. If it’s an older appliance that’s been exposed to harsher environments, it might be more susceptible to damage. This knowledge will help you tailor your polishing technique. For instance, if you’re working on highly tarnished or scratched stainless steel, you may want to start with a coarser grit when sanding to restore the surface to a smoother finish.
Taking the time to assess your surface will save you potential headaches during the polishing process. By understanding the condition of your stainless steel, you can better prepare for the steps ahead. Remember, an informed approach leads to successful outcomes, and you’re well on your way to achieving that stunning mirror finish!
Sanding Techniques for Stainless Steel
Sanding is a critical step if your stainless steel has noticeable scratches or imperfections. It helps to create a smooth surface and ensures that the final polish is uniform and reflective. For this process, you’ll need different grits of sandpaper, typically ranging from coarse to fine. Starting with a coarser grit will help you tackle deeper scratches, while finer grits will prepare the surface for polishing.
Begin by selecting the appropriate grit. If you’re dealing with heavy scratches, start with around 120 or 220 grit sandpaper. For light scratches or to refine the surface after initial sanding, switch to 400 or even 600 grit. Using the right grit is crucial for reducing the risk of introducing new scratches during the sanding process. Always make sure to sand in the direction of the grain. This will help maintain the natural appearance of the stainless steel.
As you sand, apply consistent pressure but do not overdo it. Too much pressure can lead to uneven surfaces or worse, deeper scratches. Make sure to keep the sandpaper dry, as moisture can create mud that clogs the sandpaper and defeats its purpose. Sand technique is just as important as grit choice. Use long, even strokes, maintaining the direction of the grain. A back-and-forth motion is generally not advisable.
After you have sanded down the entire area, it’s crucial to clean away any debris. Use a damp cloth to wipe the surface free of dust and metal shavings. Rinsing with warm water before drying will help remove any remaining particles. Skipping this cleaning step can interfere with the polishing process and may result in a subpar finish.
Once you are satisfied with the sanding, inspect the surface again. Check for evenness and smoothness. If certain scratches still stand out, you may need to sand those areas again using a finer grit to bring the entire surface up to the same shiny standard. Remember, patience is key here. The initial sanding can seem like a tedious task, but getting it right will pay off once you start polishing.
Polishing with a Power Tool
Using a power tool can significantly speed up the polishing process, especially for larger surfaces. An angle grinder or a rotary sander fitted with a polishing pad is often the best choice for this task. Before you start, ensure you have appropriate polishing compounds, as these will greatly enhance the final look.
Start by attaching a polishing pad to your power tool. Make sure it is secure and compatible with the tool you are using. After that, apply a small amount of polishing compound to the pad. You can always add more as you go, but starting with too much can create a mess and waste product. Before turning on the power tool, gently work the compound into the pad by rubbing it against the stainless steel surface. This will help prevent the compound from flying off once the machine is on.
Next, set your power tool to a low speed. This will allow you to gain control and avoid damaging the stainless steel surface. Begin polishing by moving the tool in the direction of the grain. Avoid stopping in one spot, as continuous pressure can cause overheating. As you polish, you will notice the surface quickly transforming. Keep an eye on the pad; if it becomes excessively dirty, switch it out or clean it to ensure you’re not reintroducing any scratches.
After several passes over the area, it’s vital to step back and inspect your work. Look for areas that may need more attention. If you find spots that don’t seem to shine as brightly, you may need to polish them a bit longer. Make sure to periodically clean the surface with a lint-free cloth to remove any excess polishing compound. This will allow you to see the true shine of the metal.
Once you’re satisfied with the results, take a clean cloth to buff the entire area one last time. This will help bring out that deep, reflective finish and eliminate any fine residue left behind. After all, the goal is to achieve that stunning mirror finish that enhances the beauty of your stainless steel!
Hand Polishing Techniques
While power tools are great for efficiency, hand polishing techniques should not be overlooked. Sometimes, using your hands allows for better control and precision, particularly in smaller areas or intricate designs. For hand polishing, ensure you have quality polishing cloths, a polishing compound, and enough time set aside.
Start by applying a small amount of the polishing compound to your lint-free cloth. Ensure that your cloth is lightly saturated but not dripping. Using a circular motion, start polishing the stainless steel. Make sure to work in the direction of the grain to avoid scratches. This method may take a little longer than using power tools, but the control you have is invaluable, especially when working on detailed pieces.
As you polish, pay attention to pressure and technique. Too much pressure can create new scratches, while too little may not yield any noticeable effects. Consistency is important for achieving that lovely shine. Move your cloth smoothly across the surface, overlapping each stroke slightly for a uniform finish. Hand polishing allows you to focus on areas that need extra care, like corners and edges.
Once you’ve covered the entire surface, take a step back and evaluate your work. Is it shiny enough? Are there any spots that still look dull? If some areas need additional polishing, go over them again with a bit more compound on the cloth. Remember that patience and thoroughness are key to exceptional results.
After achieving the desired shine, do a final wipe-down with a clean, dry cloth. This will remove any excess polishing compound and enhance the reflective quality of the stainless steel. Hand polishing might take more time than using power tools, but the results can be very rewarding. Plus, the sense of accomplishment in seeing your hard work shine through adds to the satisfaction of your polishing project!
Final Steps and Maintenance
After completing the polishing process, the final steps are crucial for maintaining that stunning mirror finish. Your work doesn’t end after polishing; proper care will ensure that your stainless steel remains shiny for a long time. Inspect the surface thoroughly again, looking for any spots that may have been missed or areas needing further attention.
Once satisfied with the polished outcome, it’s time to clean the surface again. Use a mild detergent and warm water to wipe down the stainless steel. This will help remove any leftover polishing compound and prepare the surface for maintenance. Make sure to dry the area immediately with a soft cloth to prevent water spots from forming.
Next, it’s wise to apply a stainless steel cleaner or a protective polish made specifically for stainless steel. This can help create a barrier against fingerprints, smudges, and grime. Applying a thin layer of protective polish can be a game changer. It not only enhances the shine but also simplifies future cleaning.
For ongoing maintenance, always clean your stainless steel surfaces regularly. Using a damp cloth and a little dish soap can usually do the trick. Avoid abrasive cleaners and sponges, as these can scratch the surface and diminish the mirror finish. When cleaning, always remember to wipe in the direction of the grain for the best results.
Finally, consider implementing a routine checking system. Every few months, take a look at your stainless steel surfaces to see if they need a touch-up polish. Early intervention can prevent the buildup of scratches and tarnishing, keeping your finishes looking pristine. By following these maintenance steps, you’ll be able to enjoy your stunning mirror finish for years to come, enhancing the beauty and durability of your stainless steel.
Understanding the Importance of a Mirror Finish
Achieving a mirror finish on stainless steel is not just about aesthetics; it also serves practical purposes. The shiny surface helps reduce the visibility of fingerprints, smudges, and water spots. This makes maintenance easier and keeps your appliances and fixtures looking fresh. A mirror finish can transform a dull, scratched surface into something that catches the eye and enhances the ambiance of your space.
Moreover, a shiny stainless steel surface reflects light effectively. This can brighten up an area, making it feel more open and inviting. In kitchens, for instance, the reflective quality of polished chrome or stainless steel can create a modern and spacious feel. It’s similar to how mirrors can make a small room seem larger. This added light can enhance the overall atmosphere, especially in spaces where natural light is limited.
On a practical level, a smooth and shiny surface also offers a layer of protection against corrosion. The process of polishing removes surface imperfections and produces a tight, flat layer. This makes it harder for dirt and contaminants to settle, thus providing a cleaner surface that requires less frequent maintenance. Over time, this can prolong the life of your stainless steel surfaces.
Lastly, having a mirror finish can elevate the value of appliances and fixtures. Whether it’s a high-end refrigerator or a sophisticated sink, a brilliant finish can increase its appeal. Not only do buyers prefer shiny appliances, but they also associate them with quality and durability. Thus, investing time to achieve a stunning mirror finish has benefits that extend beyond mere visual pleasure.
In summary, the importance of attaining a mirror finish goes beyond looks. From easier cleaning to increased light reflection and added durability, it all contributes to a better user experience. Understanding these practical benefits will help motivate you as you work on your stainless steel surfaces.
Tips for Long-Lasting Results
Once you’ve achieved that stunning mirror finish on your stainless steel, it’s vital to adopt habits that will help maintain the shine. Here are some tips to ensure that your efforts last as long as possible. First off, routine cleaning is essential. Make it a habit to clean your stainless steel surfaces regularly with a gentle cleaner and a soft cloth. This will help to prevent the buildup of grime and maintain that polished look.
Another effective tip is to avoid using abrasive cleaners and scrubs. These can scratch the surface and eradicate your hard work. Instead, opt for non-abrasive cleaners specifically designed for stainless steel. These products are formulated to clean effectively without causing damage, ensuring the longevity of your mirror finish.
Consider applying a protective coating periodically. Some specialized products act as a protective barrier, making it easier to wipe away dirt and smudges. These products can save you time in the long run and drastically reduce the effort required for cleaning. Look for options that are easy to apply and suitable for the type of stainless steel you have.
Also, keep an eye on any scratches or blemishes that may appear over time. Addressing these immediately will prevent further deterioration. If you notice any signs, simply follow the steps to sand and polish as needed. Early intervention can limit the work required for maintaining that perfect shine.
Lastly, make sure to dry the surface thoroughly after cleaning. This helps prevent water spots that can dull the shine. Always use a clean, dry cloth for this purpose, ensuring that no moisture is left behind. Implementing these tips will go a long way in preserving the beauty of your polished stainless steel for years to come!
Common Mistakes to Avoid
While polishing stainless steel seems straightforward, several common mistakes can lead to frustrating results. Understanding these pitfalls will help you avoid wasting your time and effort. One such mistake is skipping the cleaning step before polishing. It’s essential to start with a clean surface; otherwise, you may end up grinding dirt and grime into the metal. Always clean before you start polishing, no exceptions!
Another mistake is using the wrong polishing compound. Not all compounds are suitable for stainless steel, and using an incompatible product can cause harm. Ensure that you select a compound specifically meant for stainless steel. This will yield the best results and protect the integrity of your surface.
Over-polishing is another common issue. While it may seem like more polishing will yield a better finish, excessive buffing can wear down the surface. Instead, focus on controlled and efficient polishing. Take time to evaluate your progress at different stages. If the shine doesn’t seem to improve, it may be time to stop rather than risk damage.
Also, improper sanding can lead to scratches. Always make sure you are sanding in the direction of the grain. Going against the grain can create more imperfections that will be challenging to fix later. Use the right grit sandpaper for your needs and take your time with this step.
Lastly, not inspecting the finished product can be a costly mistake. Always take a moment to check your work after polishing. If you find areas that require additional attention or notice streaks or dull spots, address them immediately. Being diligent will ensure that your stainless steel has that bright, flawless mirror finish you desire.
Final Review and Touch-Ups
After completing the polishing process and cleaning the surface, it’s time for a final review and touch-ups. This step is critical for ensuring that you have achieved the desired mirror finish. Begin by inspecting the entire surface in good lighting. Look for any spots that may have been missed or areas that need additional polishing. A bright light can help identify imperfections that may not be visible under normal conditions.
If you find any dull spots or scratches, it’s essential to address them promptly. For minor imperfections, you can simply use your polish and a clean cloth to touch them up. If the area is more pronounced, a quick sanding followed by polishing may be in order. Always sand in the direction of the grain and be sure to clean away any dust and debris before polishing again.
After touching up these areas, make sure to conduct another cleaning to remove any residue left behind from the sanding process. Use a gentle cleaner and a lint-free cloth to achieve the best results. A clean surface will allow you to assess the final look more accurately and ensure that no polishing compound remains.
Once you are satisfied, perform a final buff with a clean polishing cloth. This step enhances the shine and helps remove any lingering streaks. The goal is to leave the surface with a bright, reflective finish that looks professional.
Lastly, don’t forget to step back and admire your hard work! Recognizing the results of your effort adds to the satisfaction of the entire process. By taking these final steps and making adjustments as necessary, you’ll ensure that your stainless steel surface maintains that brilliant mirror finish for a long time to come.
FAQs
How often should I polish my stainless steel surfaces?
The frequency of polishing depends on the usage and environment. In high-traffic areas such as kitchens, it may be beneficial to polish every few months. For less frequently used items, a polishing once or twice a year should suffice. Regular cleaning will help maintain the shine in between polishing sessions.
Can I use vinegar to clean stainless steel?
Yes, vinegar can be safely used to clean stainless steel. It’s an effective natural cleaner that can help remove fingerprints and smudges. However, be cautious not to leave it on the surface for too long, as acidic substances can tarnish the finish if left unattended. Always rinse with water afterward.
Are there any products I should avoid when cleaning stainless steel?
Absolutely. Avoid using abrasive cleaners, scouring pads, and steel wool. These can scratch the surface and diminish the mirror finish. Additionally, avoid bleach or ammonia-based cleaners, as they can corrode stainless steel and cause discoloration. Stick to non-abrasive cleaners specifically formulated for stainless steel.
Can I achieve a mirror finish without power tools?
Yes, you can achieve a mirror finish without power tools by using hand polishing techniques. While it may take more time and effort, using high-quality polishing compounds and soft cloths can yield excellent results. Just ensure to work consistently and in the direction of the grain.
What is the best way to maintain a mirror finish on stainless steel?
To maintain a mirror finish, regularly clean your stainless steel with a gentle cleaner and a soft cloth. Avoid abrasive cleaners and always wipe in the direction of the grain. Applying a protective polish periodically can also help keep the finish looking brilliant and reduce maintenance needs.
How can I remove deep scratches from stainless steel?
Deep scratches may require sanding followed by polishing. Start with a coarser grit sandpaper to address the scratch and gradually move to finer grits. After sanding, clean the area thoroughly, then apply a polishing compound to restore the shine. Be sure to follow the direction of the grain while sanding and polishing for best results.